
Congratulations! You now have access to our free investor website template.
You’ll find the files to download below. Most likely you’ll need instructions on how to use them. You’ll find instructions a little lower on the page.
Download the WordPress Theme File
You’ll need to install this on your WordPress site.
Download Content
All the professionally-written content (text) and images for your site.
(right click and choose “Save Link As” or “Save Target As”)
Download Forms
This will save you time so you don’t have to manually create all the forms fields.
(right click and choose “Save Link As” or “Save Target As”)
Or, if you want to use Gravity Forms for your forms to have an interactive form, click here to download the Gravity Forms version.
Step 1: Get a domain name (click for instructions)
A domain is like YourName.com. For example, JohnBuysHouses.com.
You can get a domain name cheap from NameCheap or GoDaddy.
You don’t need to buy any of their add-ons, just the domain name.
Step 2: Set up web hosting (click for instructions)
Web hosting is where your website is installed. Every website has to be hosted somewhere. You can get hosting from NameCheap. When you go to that page, go to Hosting ->WordPress Hosting. Be sure to go to Hosting -> WordPress on that page because it will be easier for setting up and will cost you less. As of this writing, they’re running a special where you can get your first year for under $10.
Step 3: Point your domain name to your hosting (click for instructions)
If you got your domain name and your hosting from NameCheap, it should be easy to connect your domain to your hosting from your account.
If you used other companies, you’ll need to get the settings from your hosting company. Usually this is called the “Name Server” and they will tell you what to use. You’ll need to go into Name Cheap or wherever you registered your domain name to change the Name Server settings.
Step 4: Install WordPress (click for instructions)
WordPress is the platform we’ll be using for your website. This needs to be installed on your new website. You’ll need to log in to your hosting account to do this. If you’re not sure how to do this, you can contact your hosting company (such as NameCheap) and they can help you. Once you’ve installed it, you’ll have a username and password you can use to log in to your website.
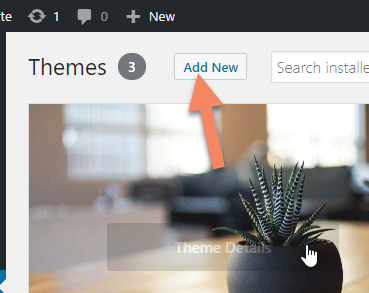
Step 5: Install Theme (click for instructions)
After logging in to WordPress on your new website, go to Appearance -> Themes

Click “Add New”. (This will be at the top of the page.)
Click “Upload Theme”. (This will be at the top of the page.)
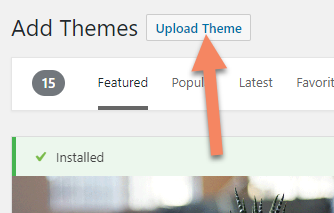
You’ll see a section that says, “If you have a theme in a .zip format, you may install it by uploading it here.” Under that you’ll see a button you can click to “Choose File”. Click that and find the file on your computer that you downloaded from our website. It’s the one called “donedeal.zip”.

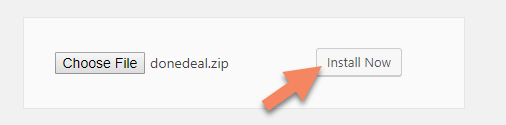
After selecting the file, click the “Install” button to install the theme.
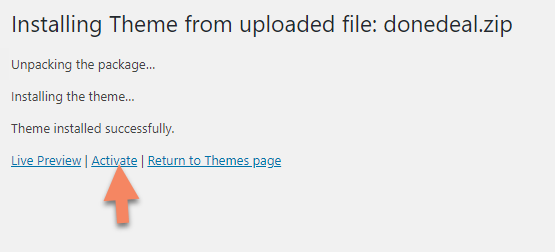
After it finishes installing, click “Activate”.
Step 6: Import Content (click for instructions)
In WordPress, go to Tools -> Import

Scroll down and find “WordPress”.

Click “Install Now”
When it finishes, click “Run Importer”

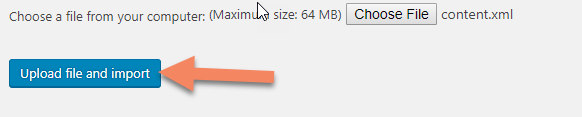
On the next page click “Choose File”. Select the file you downloaded from our site called “content.xml”.

Click the “Upload file and import” button.
Next it may ask you who the author should be for the new content. Click the drop-down menu and select your username.

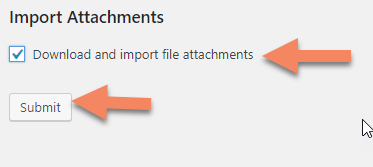
Under “Import Attachments”, click the checkbox for “Download and import file attachments. Then click Submit.
Now you should have all the pages and other content.
Step 7: Install Forms Plugin (click for instructions)
In WordPress, go to Plugins -> Add New

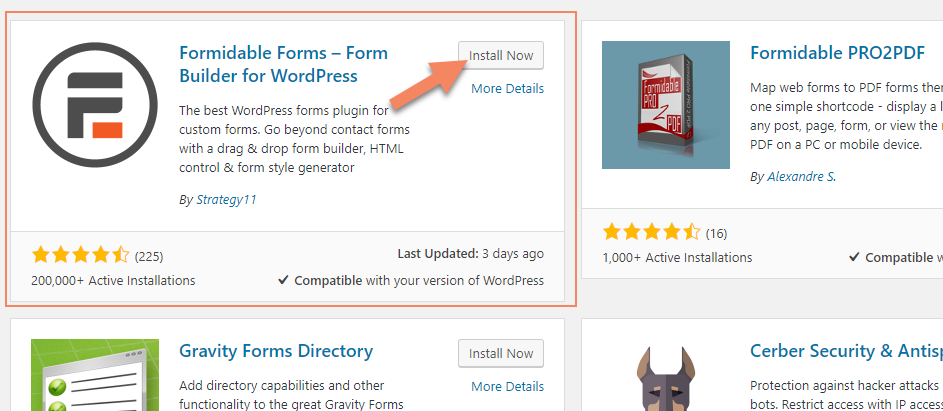
In the search box, type: “Formidable”

The Formidable plugin should be the first one that shows in the list below. Click the Install button.
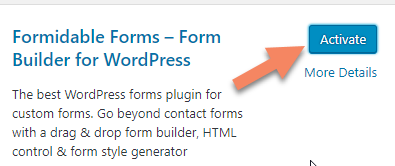
After it installs, click “Activate”.
If you prefer, you could use Gravity Forms instead, which is a paid plugin. It has the option to have conditional fields, so that the form is interactive and changes based on what people fill out.
Step 8: Import Forms (click for instructions)
In WordPress, go to Formidable -> Import/Export

In the “Import” section at the top of the page, click the “Choose File” button to find the file you downloaded from our site. It will be called “forms.xml”.
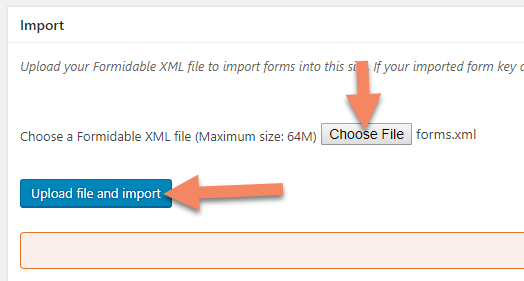
Click the “Upload and Import” button.
Or, if you’re using Gravity Forms, use the file called “motivatedsellers.json”.
Step 9: Add Forms to Pages (click for instructions)
Go to Pages
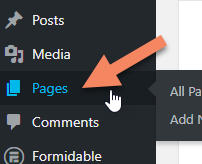
Click the “Contact Us” page (or you can click Edit under it)
In the box with the text content for your page, click at the bottom to put your cursor at the bottom of the page. Make sure it’s on a new line by itself at the bottom of the page. If you see something on the last line about “formidable”, you can delete that line first.
Click the Formidable button (this will be just above the toolbar that has buttons for making text bold, italic, etc.)

In the “Select a form” drop-down menu, select “Contact Us”. Click the “Insert into Post” button at the bottom.

Click the “Update” button to save your changes.

Repeat the process for the page called, “We Want to Buy Your House!” and use the form called “Motivated Sellers”.
Step 10: Edit the Menu (click for instructions)
Go to Appearance -> Menus

You should be on the menu called “Main Menu”. If so, find the Menu Settings near the bottom of the screen. Next to “Display location”, click the box for “Header Menu”.

Click “Save Menu”.

Step 11: Edit the Sidebar (click for instructions)
Go to Appearance -> Widgets

Under “Main Sidebar” on the right, you may see a bunch of little boxes like, “Search”, “Recent Posts”, etc. You’ll need to delete those. Click on each one to expand it, then you should see a “Delete” link at the bottom of the box. Click that.

Repeat the process with all of the items. You want to delete everything.
After deleting all the widget boxes, you’ll need to add a new one. In the left column, find the widget called “Text”. Click it. This should cause a little menu to drop down, and “Main Sidebar” should be checked. If it’s not, click it to put a checkmark next to it. Click the “Add Widget” button.

Now, this should have added a little text widget on the right column in the widget area called “Main Sidebar”. Click that box to expand it so you can edit it.
There are two tabs just above the editing area: Visual and Text. Click the tab that says “Text”.

Copy and paste the following code into the box:
<a class="donedeal-sc-button red xl" href="./we-buy-houses/">Get Started Now!</a>
Click the Save button.

Step 12: Add Header Image (click for instructions)
Go to Appearance -> Customize

In the menu on the left, click “Site Identity”.

Under “Upload Banner”, if you see an image there of a house with clouds and sky, you’re done with this step and can move on to the next step.
If you don’t see an image there of a house with clouds and sky, click “Select Image”.
On the next screen, click the tab at the top that says “Upload Files”.
Click the button that says, “Select Files”.
In the box that pops up, in the box that says “File Name”, copy and paste this URL:
https://template.donedealwebsite.com/wp-content/uploads/sites/65/2015/01/sold_sky_house021.jpg
Click Open, then Choose Image.
Click the button at the top of the left column to save your changes.
Step 13: Set Your Home Page (click for instructions)
You need to tell WordPress which page on your site is your home page. To do that, go to Settings -> Reading.
The first section on the next page will say, “Front page displays”. By default it usually has “Your latest posts” selected. You need to change that to “A static page”. Click to select “A static page”.
Next, you’ll see a drop-down menu next to “Front page”. Click that, then select the one called “Home”.

Scroll down to the bottom and click “Save Changes”.
Step 14: Test Your Site (click for instructions)
You did it! Now it’s time to test everything and make sure it works properly.
Visit your website by typing your domain name into the address bar of your web browser. Or if you’re logged in to your site, just click the “View My Website” link in the dark bar at the top of the screen.
If something doesn’t look right, double check that you followed all the steps correctly.
Test all the links on your site and make sure they take you to pages on your own site. It’s possible that some links might not have updated correctly to your own site and might be pointing to our template site. So click each link and make sure the web address in your browser’s address bar shows the correct web address. In other words, they should all have your domain name at the beginning and you shouldn’t get any error messages.
Next, text the forms on your site by filling them out. After you submit them, you should receive an email with the details. If you don’t, there are a few possibilities as to why it’s not working. The first thing to check is the email address you used when you installed WordPress. Go to Settings -> General and double check your email address on this page. If it’s not right, change it.
If your email address is correct, it’s possible the email went to your Spam / Junk Mail folder. So check that.
If it’s not there, give it a few minutes since sometimes it can take a little while for messages to come through.
If you never receive the email, contact your web hosting company. It could be a problem on their end. Sometimes their servers can get “blacklisted” where email services block messages from their servers. Typically that’s something they have to resolve for you.
If everything looks good and works properly, congratulations! You’re ready to start marketing to send people to your new web site.
Disclosure: Some of the links above are affiliate links, meaning, at no additional cost to you, we will earn a small commission if you click through and make a purchase. However, we recommend these services because we use them and have had good success with them so far. You don’t have to use our links, but we’re a small business and this helps us offset our costs, so we appreciate it.
Don’t want to deal with the technical stuff?
Sign up for one of our website plans and we take care of the technical stuff for you!
Instead of 14 steps, you will only have 2 steps.
Plus, we include landing pages for 10 different types of leads, plus many powerful tools that will help you with your real estate investing business!
Click here to check out our paid plans!
Or…